I was working on a project for a non-profit organization this weekend, and I ran into an issue that caused some head-scratching. The group needed a large mass mailing, and the process of getting the data into an XL-sheet and running a Mail merge using Word seemed easy enough. It was, except for the fact that Word creates one big document as a result (even though you get that by selecting the somewhat misleading "Edit individual documents").
We needed a separate Word document for each record of the Mass Mailing and Word can not do that.
After searching for some time, I was ready to write a macro myself, but luckily I found Graham Mayor's website with a nice Add-in that solves the problem. The add-in will intercept the command to merge to a new document and provides an additional option to merge to separate document files:Graham's website contains a ton of other Word Tips. I haven't checked them out yet, but it definitely looks worthwhile.
Saturday, December 29, 2007
Monday, December 17, 2007
Office 2007 SP1 is out
A few days ago I learned through John C Dvorak's splendid Tech 5 report that Microsoft published SP1 for Office 2007.
I downloaded SP1 from the Microsoft Download site and installed it. It took about 5 minutes.
I'll have a look at the details of the Office 2007 SP1 package and let you know about my experiences with it in the next couple of days.
By the way, check out CrankyGeeks with John as well. I admit, I am a fan!
Tuesday, December 4, 2007
Guides to the 2007 Office system user interface on one page
I've talked before about the Interactive Guides on where to find a command in Office 2007, if you know where it was in 2003. The links still work, but meanwhile Microsoft has put them all on one page.
You not only get links to the Interactive Guides for Access, Excel, Word, PowerPoint and Outlook, you can also download them.
Also, on that same page, you'll find links to Mapping Workbooks, which are Excel Workbooks that contain lists of all Office 2003 menu and toolbar commands and their locations in the 2007 Office system.
Friday, November 30, 2007
SharePoint 2007: What's new
Some further reading and testing with SharePoint 2007 has only increased my enthusiasm. Without having it all tested extensively, the new things I like are:
- The Recycle Bin: finally a way to 'undelete'
- Bread crumbs: It's a lot easier to understand where you are in a site
- Workflows: both to collect feedback and as a approval mechanism
- RSS support: see an example in my post of yesterday
- Project Tasks Lists with Gantt Charts
- Blog and Wiki support
Thursday, November 29, 2007
SharePoint 2007: My first impressions
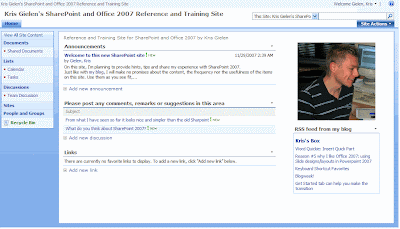
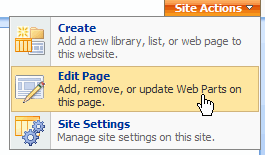
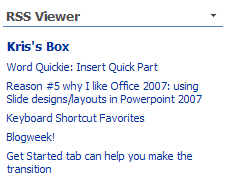
I just started using SharePoint 2007 and my first impressions are good! I have dealt with SharePoint 2003 for a few years now, and while it has some nice collaboration features, it is not very intuitive nor attractive. SharePoint 2007 seems to be improved in both areas. It looks a lot nicer, and more importantly, the user interface has been significantly upgraded, so that most actions are a lot easier.As a test, I tried to get the RSS feed of this blog into my SharePoint 2007 site. This was easier than I expected. Using the Site Actions button at the upper right corner, you need to select Edit Page. This will enable you to modify the home page.
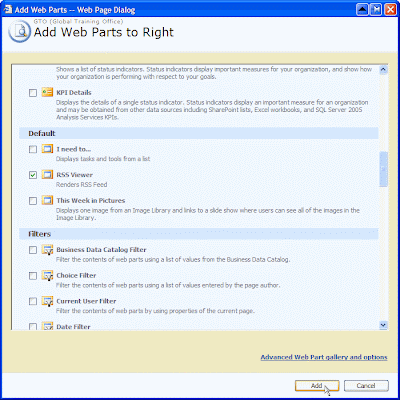
Clicking the button Add a Web Part in the right column will give you a dialog box where you can select the various Web Parts that are available. One of the options is RSS Viewer:
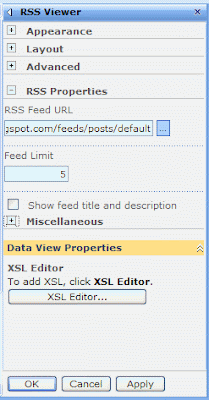
This will add an RSS Viewer to the right column. To link it to a real RSS feed, you need to click the link Open the tool pane. This will open a pane at the right hand site, where you can fill in the feed URL and the number of items you want to show.
You can also select whether you want to display only the title, or the title and the full description:If you're really brave, you can even change the XSLT that is used to display the RSS feed, but the default settings seems to work just fine:
The final modification I made was to change the layout.
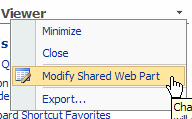
I clicked the arrow at the right hand side of the title, and selected Modify Shared Web Part. That will open the tool pane again, where you can make modifications for Appearance, Layout and some Advanced Settings.
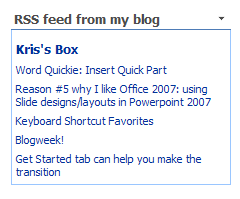
I changed the title and selected another "chrome" (Title and Border instead of the default chrome). And this is the end result:
In a matter of minutes, I added my blog feed to the SharePoint 2007 site. Cool!
Wednesday, November 28, 2007
Word Quickie: Insert Quick Part
If you repeatedly need to add some text in Word, the new Quick Parts button on the Insert tab will save you time.
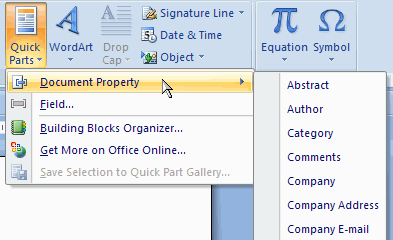
Initially, the Quick Parts menu allows you to insert the main Document Properties, or a Field:
You can easily add items to the Quick Parts menu, by selecting some text and clicking Save Selection to Quick Part Gallery.
This will give you a dialog box, where you can add some details of the Quick Part you're adding. Categories can be defined, and in Options you can select whether you want to Insert the content only, Insert it in its own paragraph, or on its own page:
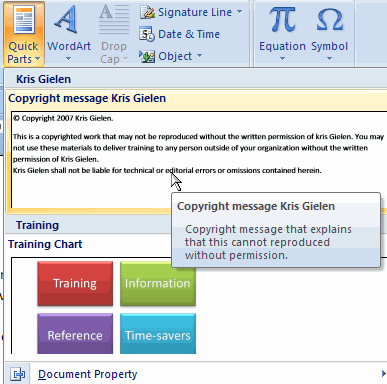
Once defined, you can insert it with just 2 clicks:
Obviously, any other item can be saved as well, like the SmartArt about Training in the screenshot above.
To change or delete Quick Parts, open the Building Blocks Organizer. It contains your Quick Parts, and you can change the properties of other building blocks as well:
There's a training on the Microsoft Office site that explains this in more detail.
Tuesday, November 27, 2007
Reason #5 why I like Office 2007: using Slide designs/layouts in Powerpoint 2007
PowerPoint XP gave us 'Multiple Masters'. Until then, we were limited to 2 master layouts: a Title master and a Content master. With multiple masters, we finally could create presentations with different, yet consistent background for different sections of our presentations.
The problem with multiple masters was that PowerPoint XP used a rather strange user interface for switching between the different masters. In Training sessions I gave, this topic always was one of the most confusing for trainees. You had to combine the "Slide Design" and "Slide Layout" panes in the Task Pane to get the layout you wanted, which was far from intuitive. PowerPoint 2003 did not improve in this area.
Finally, with PowerPoint 2007, Multiple Masters are really usable and pretty intuitive.
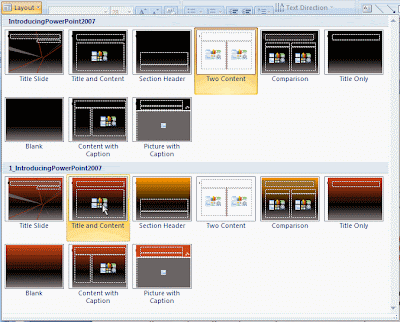
There's no difference anymore between "Slide Design" and "Slide Layout". When you need another layout, you simply click the "Layout" button. It will list all available layouts, for all masters in your presentation. With one click, you can change layout and/or master.
This is really an elegant solution to the complex issue of using Multiple Masters.
Monday, November 26, 2007
Keyboard Shortcut Favorites
I am one of those guys who likes to use Keyboard Shortcuts a lot. While I'm not particularly fond of the way Office 2007 provides keyboard access to all entries on the Ribbon (*), I do use quite a few of the "old-fashioned" Keyboard Shortcuts that worked in previous versions of Office. Luckily, all of the keyboard shortcuts in Office 2007 continue to work exactly as they did before.
These are a few of my favorites:
Excel 2007:
These are a few of my favorites:
Excel 2007:
- F2: enter formula
- CTRL+PageDown / CTRL + PageUp: Previous/Next Worksheet
- CTRL+0 (zero, not Num key zero): Hide column
- SHIFT+CTRL+0 (zero, not Num key zero): Show column
- CTRL+9 (nine, not Num key nine): Hide row
- SHIFT+CTRL+9 (nine, not Num key nine): Show row
- ALT+=: AUTOSUM
- CTRL+SHIFT+U: Resize formula bar
- When entering a formula: SHIFT+CTRL+A: fill in arguments
- CTRL+` (left apostrophe, on most keyboards above the TAB key): show formulas in cells
- CTRL+[ / CTRL+]: Increase/Decrease font size with 1pt
- CTRL+SHIFT+SPACEBAR: Insert a non-breaking space
- CTRL+SHIFT+-: Insert a non-breaking hyphen
- CTRL+-: Insert an optional hyphen
- CTRL+SPACEBAR: Remove formatting (particularly useful to remove Character Formatting)
- CTRL+K: Insert a hyperlink
- SHIFT+F5: Toggle through the last 3 locations where you were editing
- SHIFT+F3: Change case
- Quickly add a new slide, using the Layout you want: CTRL+M, Alt (**), H, L
- TAB: Move through all objects on a slide, even the ones that are not visible (behind another object). Start by selecting any object that is not a text box, then (repeatedly) press TAB.
- In presentation mode: press B to make the screen Black, B again to return to your slide. Also, press the slide number, followed by ENTER, to move to that slide.
Blogweek!
I know I should not do this, because until now, I couldn't really keep my promise to update this blog frequently, but I anyway intend to make this week "Blogweek". The idea is to post an entry to this blog every day of the the week until Friday. Let's see whether this will work :-)
Friday, October 26, 2007
Get Started tab can help you make the transition
Microsoft is offering 3 free downloads that add a "Get Started" tab to Word, Excel and PowerPoint 2007. This tab is something they probably should have included in the product itself when Office 2007 came to the market about a year ago, but at least you can download and install it now yourself.
The tab contains some useful links to ease the transition to the new version of the Office packages.
The icons on the Get Started tab are similar for each of the products. This is the Excel version:
Here are the links:
The tab contains some useful links to ease the transition to the new version of the Office packages.
The icons on the Get Started tab are similar for each of the products. This is the Excel version:
- Interactive Guide is a direct link to the interactive guide that Microsoft put on the Office webpages, which helps in finding a command in Office 2007, if you know where it is in Office 2003. I talked about it in one of my first posts on this blog. Very helpful, and now just a click away!
- Up to Speed with Excel 2007 is a direct link to the Introduction training pages on Office Online.
- Excel 2007 Overview and Get up to Speed with Excel 2007 are videos that demonstrate the new features and the basic stuff you need to know about the product.
- Discuss Excel 2007 leads you to the Excel newsgroups, community blogs, MVPs (Office Experts) and webcasts.
- Training leads to free self-paced courses.
- Videos take you to some general Office videos/demos.
- Excel 2007 will take you to the Office Online page for Excel, with an overview of all available help and training option.
Here are the links:
Labels:
Excel 2007,
Office 2007,
PowerPoint 2007,
Word 2007
Wednesday, October 24, 2007
65,535 is a difficult number for Excel 2007
A weird bug has been discovered in Excel 2007, involving calculation of numbers around 65,535. In some specific cases, Excel 2007 displays 100,000, when it should say 65,535. Microsoft claims it's a display error, i.e. that calculated value that Excel uses is supposedly correct, but that seems a bit odd.
Look for all details on the Microsoft Excel team blog.
UPDATE 26 October 2007: meanwhile, Microsoft has issued a fix for this.
Also, if you're interested in a full, in-depth explanation about the issue, have a look at Chris Lomont's detailed report (PDF).
Look for all details on the Microsoft Excel team blog.
UPDATE 26 October 2007: meanwhile, Microsoft has issued a fix for this.
Also, if you're interested in a full, in-depth explanation about the issue, have a look at Chris Lomont's detailed report (PDF).
Wednesday, September 12, 2007
This blog is not dead
It's been ages since I posted something here. Still, I intend to continue this blog, but I haven't spent a lot of time in Microsoft Office 2007 lately, so there wasn't much new to talk about. Things should improve in the autumn time frame, so you can expect more Quickies, and the completion of my Top 10 reasons why I like Microsoft Office 2007.
Meanwhile, I can point you to some interesting pages on the Microsoft Office website:
- Get Started with the 2007 Microsoft Office System with direct links to What's new, training options, a demo and templates.
- RSS Feeds on Microsoft Office Online with training, demos, columns and blogs.
- All Office Blogs in one single location.
Labels:
Office 2007 links,
Office 2007 Training,
this blog
Wednesday, May 30, 2007
PowerPoint Quickie: Replace Fonts
When I started this blog a few months ago, I promised myself I would not let it die after a few weeks, unlike many other blogs. But I have to admit, keeping it alive has been more of a struggle than I thought. It just takes a lot of time and energy to regularly publish something that is worthwhile reading. I'm not running out of ideas, I'm just having difficulties finding the time to put them into quality posts.
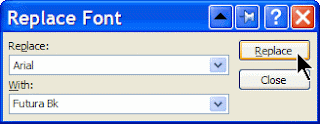
Anyway, at least this is another Quickie for you. Sometimes, when you receive a PowerPoint presentation or some Powerpoint slides that you want to reuse in your own presentation, the fonts of text boxes don't match. The previous versions of PowerPoint had a nice feature to replace a specific font with another one for all slides of your presentation.
PowerPoint 2007 still has that feature, but I couldn't find it. So I went to the Office website and looked at the Interactive Guide for PowerPoint that shows where to find a command in office 2007 if you know where it was in Office 2003.
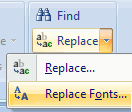
It turned out it was surprisingly straightforward: it's on the Home tab of the Ribbon, in the Replace-button.
Don't click the button itself, but the drop-down arrow next to it, and you'll be able to replace fonts quickly.
Tuesday, April 10, 2007
Dj stuff
2 weeks without updates, I should be ashamed :-)
My new toy (the Behringer BCD-2000) is partly to blame, because a new version of the B-DJ software was released.
So I played with it again for a while, and I ran into the issue of inconsistent volume levels of my MP3-collection: some mp3's sound a lot louder than others.
After some 'googling', I found a fantastic open-source program to adjust mp3 files so that they have the same volume: MP3Gain. This little piece of software is super! The changes MP3Gain makes are completely lossless, because it adjusts the mp3 file directly, without decoding and re-encoding: the mp3 format stores the sound information in small chunks called "frames". Each frame represents a fraction of a second of sound. In each frame there is a "global gain" field. This field is an 8-bit integer (so its value can be a whole number from 0 to 255). MP3Gain analyzes the song, and then adapts this value without touching the rest of the mp3 information.
Better yet, MP3Gain does not do a simple peak normalization but it analyzes mp3 files to determine how loud they sound to the human ear. It can then adjust the mp3 files so that they all have the same loudness. This is based on the Replay Gain algorithm (detailed information).
Probably best of all: MP3Gain is completely freeware. No registration, no time limits, no disabled features, no annoying pop-up messages, or anything like that.
Friday, March 23, 2007
Reason #4 why I like Office 2007: the new file format
The new file format that Office 2007 uses is an XML-based file format, which is stored on the hard disk in a compressed format. A standard ZIP-compression is used, which means that you can open Office 2007 files in a zip-compatible application.
This opens a lot of possibilities, but what I really like about it is that you can easily extract images or other embedded documents out of Word, Excel or PowerPoint files.
Better yet, this (finally!) gives me an easy way to find out why a PowerPoint presentation has a huge file size, even though I used "Compress Pictures..." before I saved.
I could put this into practice today: a colleague asked for my help because he had a PowerPoint presentation with about 30 slides, some of which contained pictures, and the file size was 11MB. Too large to send as an e-mail attachment in our organization.
I first looked at the obvious things: no master slides that were not used, no pictures that were scaled down to 25% or less, all pictures compressed and cropped... nothing that would explain the 11MB.
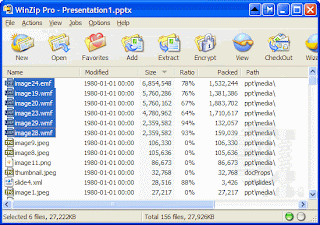
So I opened the file in PowerPoint 2007, saved it as an .pptx-file, opened that with WinZip and sorted the list on file size. The result? The presentation contained 6 images in .wmf-format, which apparently take a lot of space.
I could not have seen that in PowerPoint 2003: the images themselves were less than 300x300 pixels and were scaled at 100%, so everything looked OK.
After replacing the pictures with a .jpg-version, the PowerPoint presentation shrank to a mere 3 MB!
Wednesday, March 21, 2007
Office Quickie: View your document in multiple windows
Ever wanted to look at another slide in the same presentation while creating it? Or looking up another paragraph in the same document while working on another? Sure, you could split the window in Word 2003, but that was somewhat cumbersome and you only had a vertical split.
Enter the world of Office 2007. In Word, Excel and PowerPoint, you'll find a neat new option in the View Ribbon: New Window. One click and it opens a new window containing the same document.
You can now rearrange both views manually, or use the Arrange All button to quickly put the documents next to each other.
So now you can easily work on a slide in PowerPoint and keep an overview of where it fits in the whole presentation, e.g. by keeping the Slide Sorter view and the slide you're working on, next to each other:
Tuesday, March 20, 2007
TeleText is keeping me busy
It's been 13 days since my last post... way too long, I know. The only excuse I have is that I spent some time on an online application that can create TeleText pages. Although this is an old technology (the first specs date back to 1974), it is still being used in a lot of European countries, including my home country, Belgium.
A non-profit organization I do some volunteer IT work for is providing daily TeleText pages to the one of the national TV broadcast companies. The pages are produced with a very old, DOS-based editor. Lately this editor has caused issues, as it does not seem to work properly on the new PCs they were recently installed. Obviously, the application is no longer supported.
I felt compelled to create a more modern, online editor, but to my surprise, it was difficult to find a lot of technical information about TeleText on the internet. This is probably related to the fact that TeleText started long before there was an internet, so many documents probably exist, but only in paper format. Some of these are available online, but only for paying customers or only after you register. It feels awkward and, frankly, "last-century" behavior to keep technical specifications of an open standard hidden from the world, but it probably is an indication how much we take the internet, and information on it, for granted these days.
So I've been moving more slowly than I anticipated. Stay tuned for updates on this. And yes, I will submit another Office 2007 post this week. Promised!
Wednesday, March 7, 2007
Word Quickie: Document Properties
When creating Office Documents, is'a good idea to fill in Document Properties. This metadata (like Title, Subject, Category, Keywords, ...) not only describes the document better, but it also will make it easier to find the document afterwards, as most desktop search programs will use the metadata to index the document.
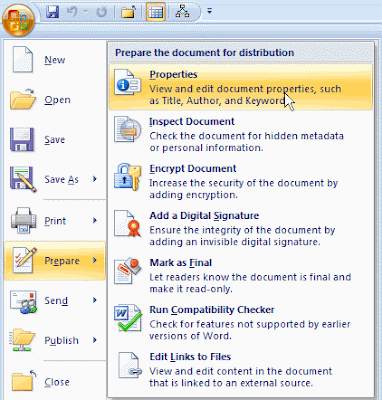
In Office 2003, you could get to the Document Properties by selecting the Properties... from the File menu. In Office 2007, I expected it to be in the View or Review tab of the Ribbon, but it is somewhere else: you need to click the Microsoft Office button and select Prepare:
The idea behind the Prepare button is to consolidate all actions you might want to take when a document is ready to be published. There's some logic to putting the Document Properties there, although I would recommend starting with defining the Properties when creating a new document, rather than filling them in when the document is final, almost like an afterthought.
When selecting Properties, you get a pane at the top of the document for the common properties:If you need custom properties, you click the Document Properties button, to get to the Advanced Properties:
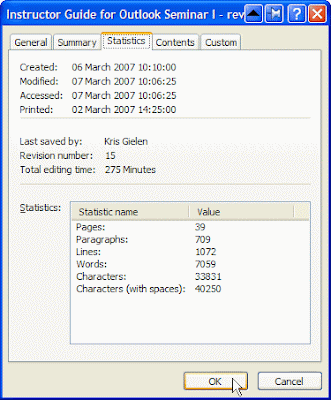
This will open a dialog box that looks very much like the Office 2003 one, with a custom tab for custom properties, but also other information like Statistics:
Wednesday, February 28, 2007
Reason #3 why I like Office 2007: Conditional Formatting Power in Excel
I teach about Office 2003 regularly, and whenever I demonstrate the Conditional Formatting options in Excel 2003, one of the first questions I get is "Great, but can you have more than 3 conditions?". I have to disappoint people then, because the limit is 3. Until Excel 2007 arrived that is. In the new Excel 2007, you may have as many conditional formats as you like.
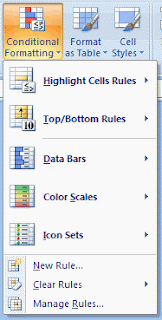
Better yet, a powerful series of commonly used Conditional Formatting rules are predefined, so visualizing information using color really is a matter of just a few clicks. The Conditional Formatting button also is prominently present on the Home tab of the Ribbon, an indication that the Excel team understands its power for users. I particularly like the Data Bars and Color Scales options:
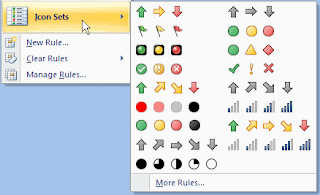
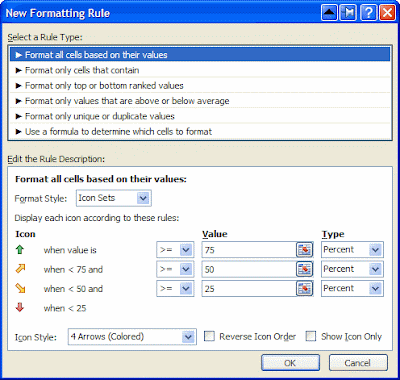
Suppose you have the following data about Sales in the first 5 months of the year:I'd like to use the 4 arrows option to quickly show whether data is going up or down, month by month. However, when I apply that arrow formatting on the range, this is the result:Not quite what I expected. The yellow arrows seems to indicate that February and March are better than January, but in fact, the trend is going down. Looking at the details of this predefined setup, I understand how Excel is using the arrows: They are used to represent a relative value in the whole range of the cells, not compared to the previous or next cell. I think this is confusing. There should be an easy way to use arrows indicating whether a value goes up, or down throughout a range, but I haven't been able to figure out how to do that. If you do, please let me know.
Having said that, the Conditional Formatting improvements in Excel 2007 are huge! What I covered here is in fact only the tip of the iceberg.
Better yet, a powerful series of commonly used Conditional Formatting rules are predefined, so visualizing information using color really is a matter of just a few clicks. The Conditional Formatting button also is prominently present on the Home tab of the Ribbon, an indication that the Excel team understands its power for users. I particularly like the Data Bars and Color Scales options:
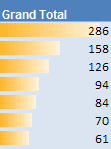
- Data Bars display a color bar across cells to display the relative magnitude of values in a cell range. It makes is very easy to get a visual representation of your data:
- Color Scales let you color cells using a color gradient. So you really can show subtle differences between numbers in different colors:
Suppose you have the following data about Sales in the first 5 months of the year:I'd like to use the 4 arrows option to quickly show whether data is going up or down, month by month. However, when I apply that arrow formatting on the range, this is the result:Not quite what I expected. The yellow arrows seems to indicate that February and March are better than January, but in fact, the trend is going down. Looking at the details of this predefined setup, I understand how Excel is using the arrows: They are used to represent a relative value in the whole range of the cells, not compared to the previous or next cell. I think this is confusing. There should be an easy way to use arrows indicating whether a value goes up, or down throughout a range, but I haven't been able to figure out how to do that. If you do, please let me know.
Having said that, the Conditional Formatting improvements in Excel 2007 are huge! What I covered here is in fact only the tip of the iceberg.
Tuesday, February 27, 2007
Listen to the Office UI guys
The TWIT Netcast network is offering a very interesting podcast this week: 2 people of the Office 2007 UI team, Jensen Harris and Jacob Jaffe, are talking about the new interface in episode 15 of "Windows Weekly with Paul Thurrott".
And while we're at it: other podcasts I like to listen to are the original TWIT (This Week in Tech, hosted by Leo Laporte) and the incredible Cranky Geeks. Yes, I admit, I am a big fan of John C. Dvorak.
Tuesday, February 20, 2007
Office Quickie: Minimize the Ribbon
The Ribbon does not take (a lot) more screen real estate than the toolbars in previous versions of Microsoft Office, but sometimes you might want to have as much space as possible.
There are 2 quick ways to minimize the Ribbon:
- double-click the active tab on the Ribbon, or
- press CTRL+F1
Labels:
Microsoft Office,
Office 2007,
Quickie,
Ribbon
Reason #2 why I like Office 2007: The Selection Pane in PowerPoint
If you don't use PowerPoint a lot, you might not fully appreciate why I love the new Selection Pane in PowerPoint 2007. I often need to play around with various objects on my slide, e.g. using animation effects to build a complex figure or highlighting certain aspects of the slide text.
In previous versions of PowerPoint, with complex slides it was not easy to understand the animation sequence, as the shapes and groups in the Custom Animation Pane were labeled "Rectangle 14", "Arrow 26" or "Group 31". These names don't help a lot when trying to get a complex animation right.
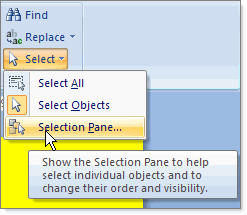
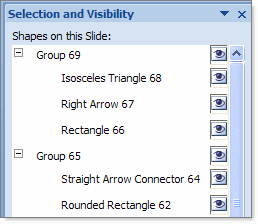
This is still the case in PowerPoint 2007, but you can easily change the name to something meaningful! To start, display the Selection Pane by clicking the Select button in the Home tab of the Ribbon:This will give you access to a pane on the right hand side of the screen, displaying all elements on the slide:
Double-clicking any of these elements will allow you to rename them (giving them a meaningful name):
That way, it's a lot easier to work with the Custom Animation sequence:
Better yet, the Selection Pane also allows to select objects that are 'behind' other objects, e.g. to change the properties or to move them, without having to move the objects that are 'above' them.
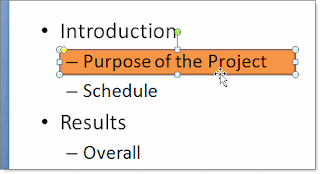
An example will clarify this: suppose I have a slide with the Agenda of the presentation. I want to indicate that the next topic will be "Purpose of the Project" by putting a rounded rectangle behind the text: If I ever wanted to change something about the rectangle, like the color or custom animation, it was very difficult to select it in previous versions of PowerPoint: the text of the slide is in front of the rectangle, making it virtually impossible to select it. I had to move away the text or send the text "To Back" to get access to the rectangle. In PowerPoint 2007 it is as easy as selecting the rectangle in the Selection Pane!
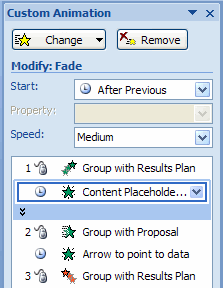
In previous versions of PowerPoint, with complex slides it was not easy to understand the animation sequence, as the shapes and groups in the Custom Animation Pane were labeled "Rectangle 14", "Arrow 26" or "Group 31". These names don't help a lot when trying to get a complex animation right.
This is still the case in PowerPoint 2007, but you can easily change the name to something meaningful! To start, display the Selection Pane by clicking the Select button in the Home tab of the Ribbon:This will give you access to a pane on the right hand side of the screen, displaying all elements on the slide:
Double-clicking any of these elements will allow you to rename them (giving them a meaningful name):
That way, it's a lot easier to work with the Custom Animation sequence:
Better yet, the Selection Pane also allows to select objects that are 'behind' other objects, e.g. to change the properties or to move them, without having to move the objects that are 'above' them.
An example will clarify this: suppose I have a slide with the Agenda of the presentation. I want to indicate that the next topic will be "Purpose of the Project" by putting a rounded rectangle behind the text: If I ever wanted to change something about the rectangle, like the color or custom animation, it was very difficult to select it in previous versions of PowerPoint: the text of the slide is in front of the rectangle, making it virtually impossible to select it. I had to move away the text or send the text "To Back" to get access to the rectangle. In PowerPoint 2007 it is as easy as selecting the rectangle in the Selection Pane!
Monday, February 5, 2007
Reason #1 why I like Office 2007: The Ribbon
The Ribbon is a bold move from Microsoft, but I believe it's the right one. As I mentioned in a previous post, your first encounter with the new User Interface might be a rough one, as it IS different from the menu system.At very first sight, you might think there still is a menu in Word, Excel and PowerPoint, as you still see "menu-like" words at the top, e.g. "View" or "Insert" or "Page Layout". But when you click on them, they don't open a menu, but the icons change at the top, giving you immediate access to the features you need the most.As an example, clicking "Insert" in Word 2007 will give you one-click access to the most common elements you are likely to insert in a document. Instead of going through a series of menu options to insert a Picture from your hard disk, you simply click the Picture icon.
Need to add the Page Number to your document? Simply click Page Number and you can immediately choose between some most common ways of formatting the page number. It really makes doing the most common things in Word, Excel and PowerPoint a lot easier and faster to find.
Bill Gates said during a keynote at PDC 05 that 9 out of 10 features that people request for the next version of Office... are already in the product. People just had difficulties finding them. A lot of the features were buried in submenus, obscure dialog boxes or task pane windows. The Ruler in Office 2007 makes finding a feature a lot easier, at least for most of the thing you'd like to do. It's pretty well organized, and you find most items where you expect them to be.
I've been using the Ruler for about a month now, and I hate it when I have to go back to a menu-driven system. Yes, it does take some time to learn a new way of working, but it very quickly pays out: you can focus more on the document you're creating or editing, instead of trying to find out how something works.
It's not perfect, and some strange decisions were taken (why do I need to go to "View" to get to Macros?), but overall, this will improve your productivity.
Friday, January 26, 2007
Word Quickie: Edit header or footer
Don't worry, the top 10 will be on this blog... in the near future :-)
It's just a bit busy these days, and I am sidetracked by a new toy, the Behringer BCD2000.
But I don't want to leave you empty handed this week, so here's a Quickie for Word 2007: I was looking for a quick way to edit the header or footer of a document. Using the Ribbon, you have to go to the Insert tab, click the Header or Footer button, and then move to the bottom of the list to select "edit Header" (or Footer). A rather cumbersome process.
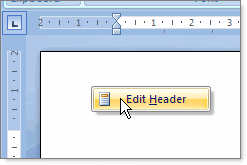
However, if you just right-click in the header or footer area, you can switch to editing the header or footer immediately. A (small) time saver.
And while you're in that editing mode, the Ruler automatically switches to the Header and Footer design tab, which gives you immediate access to add common elements like the Page Number, current Date, the Subject or Title of the document. All these are just 2 clicks away. Nice :-).
Friday, January 19, 2007
10 reasons why I like Microsoft Office 2007
Over the next weeks, I plan to publish the 10 (or so) reasons why I like the new Microsoft Office 2007 suite. It will be a collection of new features and different ways how to do things, which I hope will convince you that this is a significant upgrade.
Wednesday, January 17, 2007
Where is the ***-command?
I'll be talking about the Ribbon in Office 2007 in one of my next posts, as it is probably the most obvious and annoying changes... at first. In fact, I really like the bold move of the Microsoft Office team to get rid of the menu structure, but there is a steep learning curve.
When you first start using Office 2007 products, it really feels nice: the Ribbon feels intuitive, and you can quickly get started to create your document. But within minutes, you might feel lost: you are looking for a specific command and you simply can't find it. The traditional menu structure no longer exists and what seemed trivial at first, now becomes a source of frustration and maybe even anger: the Ribbon does not seem to contain the command you're looking for and the more you search for it, the more unreasonable the whole Ribbon idea seems.
Luckily there are quite a few ways to find what your looking for:
- First of all, there is the Help. Help information in the Microsoft Office products have been constantly improved over the last couple of versions, and this release is no exception. If you don't find a command, click the Help button at the right hand side (or press F1).
Type what you are looking for, and in a lot of cases, the answer will be in the first couple of results.
Example: You want to find the Help > About screen in Microsoft Word 2007. It does not seem be be anywhere in the Ribbon. Press F1, type "help about" and the first result gives you instructions on how to "Get the version number for your Office program and information about your computer". (In this case, it's not really in the Ribbon, but in the Microsoft Office Button > Word Options > Resources) - On the Office website, there are real cool interactive guides to quickly find your command: The guide opens with a familiar Office 2003 menu. Just click the menu or command you are looking for, and the tool will tell (and show!) you where it is in Office 2007. There's a Word, Excel and PowerPoint version.
- Finally, there is a lot of other Ribbon information available on the Office website. You can find a series of Workbooks with a mapping between the "old" Office 2003 menu structure and the new Ribbon in the Ribbon Mapping Workbooks for Word, Excel, PowerPoint and Outlook.
Thursday, January 11, 2007
A new blog
In a world where blogs seem to be everywhere, you might wonder why I also felt the urge to have my little Box to talk from. There aren't that many good reasons, except maybe for the fact that I might know a few tricks with Microsoft Office software that could be useful for others.
I am not linked in any way, shape or form to the Microsoft company, but as a Training Professional, I have used Word, Excel, PowerPoint and Outlook rather intensively over the last couple of years. I have learned to appreciate the tools when I could create cool and/or effective results and I have been very frustrated when something did not go as expected.
I hope to share some of my experiences with this blog. I will make no promises about the content, the frequency nor the usefulness of these posts. They are free, so use them as you see fit, or ignore them altogether. Comments are always welcome.
Subscribe to:
Posts (Atom)